
How to Replace the Lead Acid Batteries in your 36v Golf Cart with Lithium
It costs over $800 to replace the lead acid batteries in my 36 volt golf cart with more lead acid. Then I get the privilege to check the water level every month or so. Did I mention that the batteries have to be replaced every 5 years and weigh 65 lbs each x 6? Well, I have had enough of this crud. It's time to replace them with lithium. The following is an account of how I designed and built a lithium replacement battery for my golf cart.
What kind of battery do I need – I needed to find out how many amps my cart drew so I could choose the right kind of battery. It would suck if I build a golf cart battery using the wrong batteries. I extended the battery cable of the cart out so I could use a clamp on amp meter to monitor the current while I was driving. On flat ground the cart drew 50 to 70 amps. Climbing the hill in front of my house the cart drew a solid 150 amps for good 30 seconds. This meant that if I wanted the batteries to last that they had to be rated to output a sustained 150 amps or more.
How much battery do I need – My golf cart is not used for playing golf. We use it to haul garbage down to the corner, check the mailbox, gardening, etc. etc. If I had a 70 amp-hour battery and drew an average of 70 amps, the cart would operate for one hour before needing a charge. It takes 6 minutes round trip to check the mail in the golf cart. Ten trips to the mail box on one charge would be good enough.
Battery Management System – Daly 12S Lifepo4 36v 200A

Hello JAG35 and LEV60 batteries – There are a lot of batteries out there that were near misses, but the LEV60 batteries that JAG35 sell are a direct hit. The LEV60 is a 74 amp-hour Lifepo4 battery that has a 180 amp continuous output rating. The specs looked great and then I saw that JAG35 had a video where they configured four LEV60s to make a 12 volt battery and drew 180 amps for over 20 minutes straight. I was sold!! I ordered the next day.
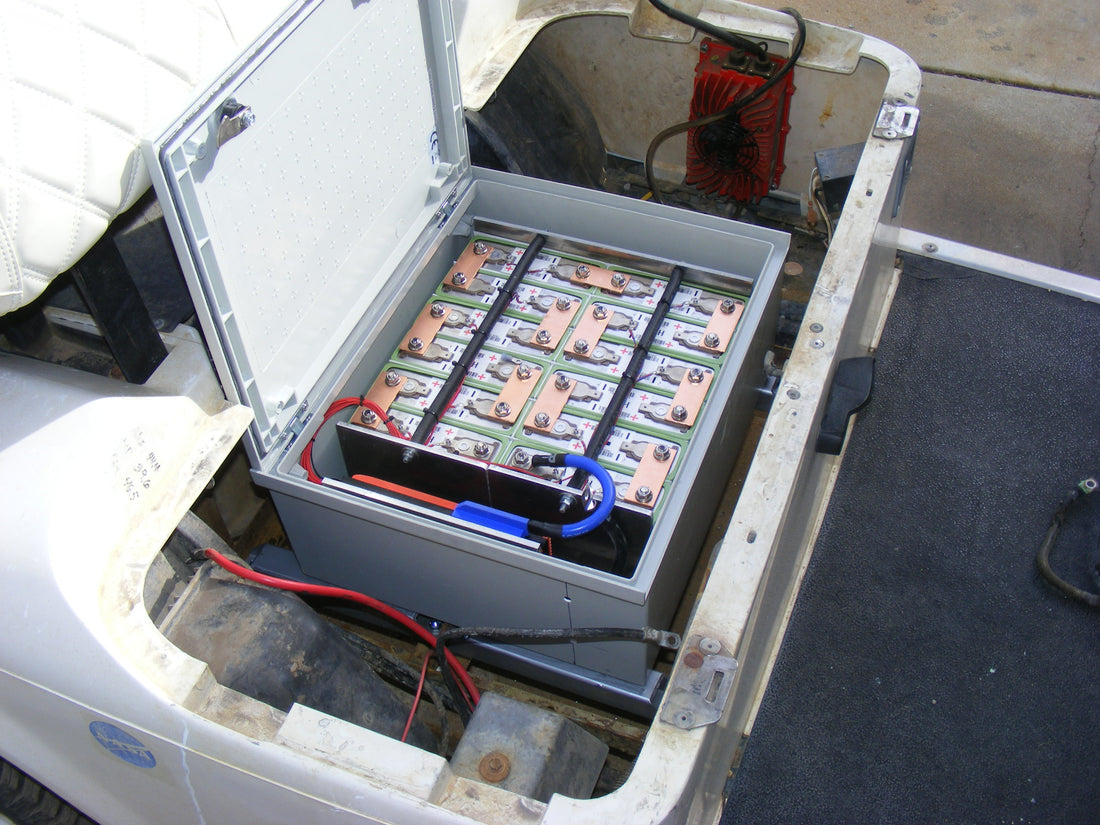
The hardest part – I spent the most of the design time on trying to find the right sized enclosure. There are a lot of “battery boxes” out there but none of them were the right size. I had to fit 12 LEV60s and a BMS into it. Then it had to fit in the golf cart. I finally found a line of Velor industrial enclosures on Amazon that were plastic, watertight and inexpensive. The batteries and BMS would mount to a plate, the enclosure would be mounted into the cart, then the plate with the batteries and BMS were lowered into the enclosure and bolted in place.
Plate construction – The plate that came with the enclosure was too thin for the weight of 12 LEV60s. So, I replaced it with an identical plate made of 1/4” thick 6061 aluminum. (See note below about getting aluminum for this project.) As you can see in the pictures, the batteries were in a 2 by 6 configuration separated by 1/16” high density foam sheets (from Amazon).

The batteries were compressed between a fixed plate and two adjustable plates of 1/4” aluminum. The fixed plate was attached to the bottom plate with drilled and tapped #10 screws. The adjustable plates had short lengths of threaded rod attached which pushed against an aluminum block attached to the bottom plate.

To finish the battery mounting I connected the tops of the plates with threaded rod insulated by fuel hose (from Autozone.) I tighten the nuts on the plates and threaded rod until the batteries were nicely compressed and not going anywhere. The BMS got its own plate of aluminum and the fabrication of the battery plate assembly was complete.

Top balancing – Before connecting up the BMS the batteries had to be top balanced. I used some nasty 12 ga house wire to connect the cells in parallel. It took a day and a half at a 20 to 30 amp charge rate before the current dropped to zero. Damn good batteries. (LEV60 cells available here)

Final plate assembly – The rats nest of black wire was removed, Buss bars installed and the BMS wired up. Plate was ready to be installed.

Enclosure and plate mounting – The mounting holes in the enclosure didn’t line up with the old battery mounting rack in the cart. I had to make four brackets that spanned the battery rack in the cart so that the enclosure had something to mount to. (Sorry, I didn’t get photos of these brackets. They aren’t anything special, just some steel I had lying around.) The brackets had short lengths of threaded rod sticking up from them. These threaded rods lined up with the mounting holes in the enclosure AND in the battery plate. When it came time to put everything together, the enclosure slid down on the threaded rod and then the battery plate slid down on to the threaded rod also. This way the weight of the batteries was transferred directly to the golf cart frame through the threaded rod. The enclosure carried none of the weight of the batteries. The cart wiring was finished up and away we went.

Final results – The lithium batteries maintained 2 to 4 volts higher voltage than the lead acid batteries while under load. The golf cart is over 300 lbs. lighter due to this conversion. Before the conversion the golf cart was a slug. Now it will spin the tires. Top speed is just a little higher and it gets there a lot quicker. I don’t have to stock distilled water anymore and these batteries should last 10 years or more.

Final cost
Batteries: 12 x $29.93 = $360
Enclosure: $105
BMS: $120
Aluminum: $40
Total: $625
For comparison – A Li Time 36volt 100AH (200 Amp BMS) is $1200.
Getting aluminum for projects like this – Metal suppliers (Industrial Metal Supply, Etc..) will often have a “remnants” section. There you can find leftover material that is close to the size you need at a discounted price and without a cut charge. The suppliers will cut material for you at a few bucks per cut. Of course, a saber saw with a metal cutting blade is often all you need.
This DIY project article was contributed by Mark Lockwood,Tucson AZ
__
Remember to check out JAG35's LEV60 batteries and the latest arrivals!